Ride 1: May 2015, The Isle of Wight Randonee.
A nice introduction to the year with the annual Isle of Wight ride, organised by the Wayfarer CTC each year on the Sunday of the early May bank holiday weekend. This is a nice ride, 100km of hilly roads around the island, and it's a great day out with a few thousand or so people (depending on the weather).
Ride 2: June 2015, The Dunwich Dynamo.
From London Fields to the Suffolk beach of Dunwich, this semi-organised event takes place overnight on the Saturday closest to the full moon in June. 186km of road to cover over the course of the night - and morning, this event is all about the atmosphere, the fellow cyclists, the people cheering us lunatics on from outside their houses during the night, and the pop-up refreshment stalls put on by budding entrepreneurs along the route. This year was the second time I took part, and was the reason my bike is currently covered in LEDs :) It was great fun, and the weather held out, which meant that set up up for the treble...
Ride 3: August 2015, The South Downs Way. In one go(!)
I've attempted to cover large swathes of the South Down on two previous occasions, the most recent being the day-long trek to meet with friends in Brighton, but this time I wanted to do the entire 100 mile route in one go. I knew it was going to be a long hard slog, so I put a lot of thought into the best way to attempt it. I set aside the August bank holiday weekend as the prime target to attempt the route, thinking it would give me several days to choose a good weather window. There was also a lot of back-and-forth when deciding in which direction to do it, and when to start - I had initially thought that starting in Eastbourne would have been a good plan, allowing me to set off in the direction of home, with the knowledge that I didn't need to arrange any transport back, but I would need to commit to a particular night in Eastbourne. However, when I found out that there would be a full moon out Friday/Saturday night that sealed it, I would start from Winchester, but in Dunwich Dynamo style, I would cycle overnight. When it came to it the weather was looking decidedly dicey, so I decided to attempt the ride on the Friday night, effectively cycling all day Saturday, starting at midnight.
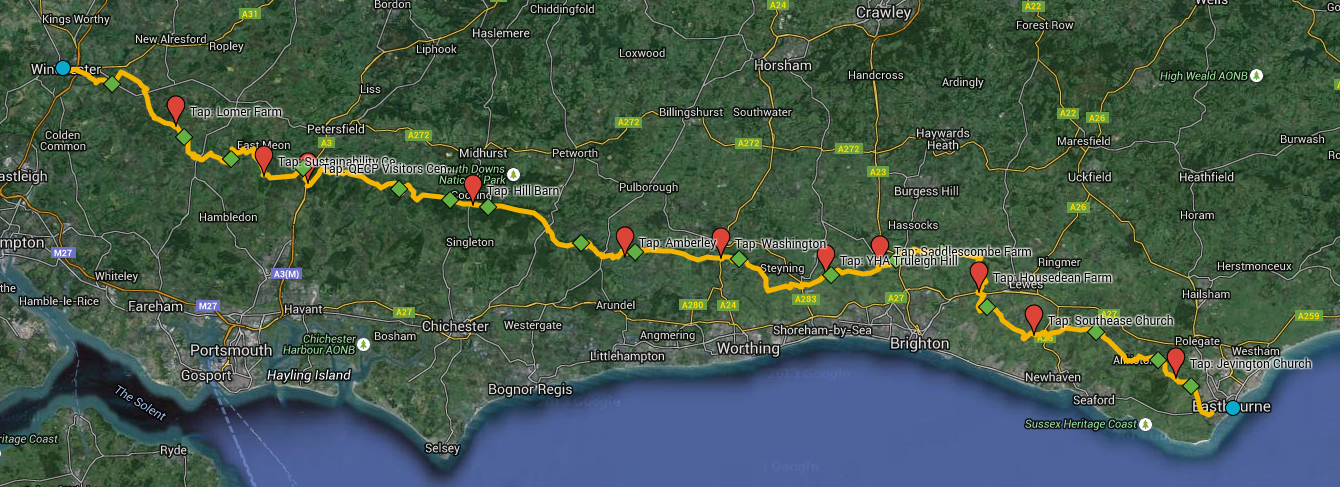
In the week leading up to the attempt I built up a Google map, plotting the route, along with major hills and the all important water tap locations. bikedowns.co.uk was an invaluable resource to help me locate the taps, and the pictures gave me a good mental picture of what to look out for when I was approaching them.
Knowing that I'd be cycling from midnight, I had a good 5-6 hours of darkness to navigate and thus needed a good supply of illumination. I loaded my bike with two lights, and three battery packs, which would hopefully be plenty to allow me to have full beam on for the entire time, with a healthy buffer.

To help my phone stay charged through the entire route I also had a 5v charger in my back, containing many, many amp-hours of capacity - more than enough to keep it fully charged for the whole day.
Apart from batteries, I also took a backpack containing the usual spare tube, cycle tool, bundle of medical supplies, and lots of food. In the end I forgot the pack the sausages, but I did take 10 energy gels, 6 oaty bars, 5 bananas and two packs of Jelly Babies.
The start:
After getting home from work on the Friday, I loaded up with pasta and had a nap, setting my alarm for midnight. I ended up taking about half an hour to get ready, and at 00:30 I set off.
Heading down through Winchester I passed the usual array of late night stragglers, and once through Highcliffe it was into the pitch black darkness of the night...
I saw no-one. With nothing but my thoughts, some occasional singing, and intent staring into the dark to plot my way I peddled, peddled and peddled some more. Up to Cheesefoot Head, down through the remnants of the Boomtown Fair, and on to the first water stop at Lomer Farm.

The first tap, 18km in at Lomer Farm
I continued all the way down to Warnford, the long slog up Old Winchester Hill, and back down the other side through the fields of sleeping cows - at least I think most of them were sleeping, it was very eerie as one occasionally stirred and gazed at me as I cycled past.
As usual, Salt Hill was too much, and the steep rocky gully got the better of me. It started badly with the very muddy flat section which then led me to fall off into a bush as I attempted to power through it. I got halfway up the hill itself before I admitted defeat and took the easier walking option.
Onwards to Butser Hill, by which time a heavy dew had formed on the grass, and made the blast down the rabbit-hole ridden slope more treacherous than usual, not including needing to weave to avoid hitting rabbits running across the path. Over to Queen Elizabeth Country Park and my first pitstop to use the loo, get some calories in me, and fill up my water bottle.
Up and out of QECP, and over the undulating hills to Harting Down, I passed under electricity pylons making an incredible buzzing sound - it must have only been the damp air, but it certainly made me pay attention as I approached.
Harting Down turned out to have more interest in store as I descended down a steep and particularly smooth section of hard-packed clay covered in dew, and my bike stepped out from underneath me... I came down on my right forearm and wrist and slid for a bit before coming to a stop. I lay there fore a moment or two, with pains in my arm, and hoping that nothing was seriously damaged I gingerly got up, to see my bike illuminating the entire path with all the colours of the rainbow only a few metres below me. I soldiered on.

Dawn breaks somewhere between Harting and Cocking

I was treated to a magnificent sunrise on the approach to Cocking.
This photo doesn't do it any justice at all, it was spectacular.
As I pulled up to the water tap at Cocking, surrounded by the full chorus that dawn brings, it was clear I wasn't going very quickly. I was intentionally saving my legs and not powering up hills as I knew I had many miles to go, so this was fine by me.

Many more km later I approached Amberley. After a short detour to the pub by the river to top up water supplies once more I re-joined the 'Way and faced the hill I knew I couldn't get up. Amberley Mount. And the one after it, the gratuitously placed Rackham Hill(?). Short, steep, and somewhat impossible to get up I relented and walked up as soon as came off as it was impossible to even try and get back on, and I didn't want to use all my energy up before half distance!
On I plodded, and by the time I got to Chanctonbury Ring around 10am the sun was out and the day was beginning to look rather pleasant

Looking back on Chanctonbury Ring
Having managed to miss the water tap at Washington I carried on knowing the next one was at Truleigh Hill YHA, at the top of a huge hill. Passing through Botolphs and over the river Adur, a huge hill imposes itself in ones vision. I had thought this was Truleigh Hill, but it seems to be Beeding Hill that then rolls into Truleigh Hill. From river level it rises some 160m and I was determined to beat it.


From the top of Beeding Hill, just before Truleigh Hill
When I cycle I like to do so at a generally leisurely pace so that I can appreciate the views, and this cycle was no exception. Riding 100+ miles with your head down all the time isn't a lot of fun, so the view is my reward.
A quick pitstop for water and a loo break at the YHA and I was back on the bridleway, targetting an early lunch stop at Devils Dyke.

11:45 and the pub wasn't open, so I, like a load of other people, had to wait

Lunch rations, a 9oz burger and chips
I afforded myself an hour off to wait for the put to open and then get food, and by 12:45 I was back on my bike again. At this point I was going into uncharted territory. The last time I cycled any great distance on the 'Downs I was going to Brighton, so this is where I left the trail. Any hills I came across from this point on would be new to me. The profile section of the bikedowns website indicated I was in for a treat: massive hills!
Down, up, and down to Pycombe, and then up again through the golf course I started the trek up to Ditchling Beacon. I was surprised that this wasn't as bad I thought it would be. I have heard stories of Ditchling Beacon from those who have done the London-Brighton ride, but either I was coming at it from a different direction and it wasn't as steep, or I have lots of gears on my mountain bike, or I was just in the zone, I made it up and over without any dramas :)
Down to the A27, and then up and over another big hill to get to Southease where once again I managed to miss the water tap :(
Next up was the rise up to Firle Beacon with the bulk of the height gained up Itford hill, and this was a beast!

The imposing track could be seen curving up the hill from the river crossing
From the river I could see the initial sweep across the hill which looked doable, and I settled in for the long slog. As I approached what would be the point at which I double backed on myself I saw people right at the top and though that surely I wouldn't need to go right to the top... Alas it was true, but I was so determined on this hill and ploughed on through. I managed to make it all the way to the top of Firle Beacon some 5km from the river without stopping (apart from a couple of gates). At this point I was feeling rather pleased with myself for conquering what looked like an unfeasibly steep hill from the bottom. I was definitely helped by the grassy surface, something I would not be so lucky with in the upcoming hills...
Down to Alfriston, and at sea-level once more I knew there were only two more major hills; Windover Hill and then one smaller one about half the height. Not far now.
The signage in Alfriston was terrible. No signs at all that I could find in the village, which meant I was forced to look up the route on my phone. Over the river, and then more confusion as it seemed I should be going along the road for a short section, but the sign pointed along a boggy riverbank. Some more phone checking and I chose to backtrack a bit and take the road. It turned out the field would have been OK, but it didn't look good - probably fine for walkers, but not really for bikes.

Windover Hill
Windover Hill was not nice. It was rocky and rutted, and at parts very steep. I somehow stayed on my bike, helped once again by the easiest gear my bike could offer - it had had good use this far, and would still be needed again.
Down to Jevington, and I was on the look out for the church where I would have my final chance to get a much needed top up for my water bottles. Thankfully this stop was right on the route, and I found it without trouble, and had a quiet moment knowing there would only be on more big hill. I also had half a bag of Jelly Babies :)
Going up what I knew would be the final hill I still hadn't caught sight of Eastbourne at all by this point. Unlike heading to Brighton, which you can see from miles out up on Chanctonbury Ring, Eastboune is completely hidden from view until you clear the last hill and are practically on top of it.
By this point someone had marked the trail with spray painted orange arrows, which meant progress at junctions was nice and quick - I assume some race had been by this way recently.
At 7:06pm I got my first sight of the legendary end of this epic route, surely it's all downhill from here :)

By this point I was beginning to think that it's be dark by the time I made it down to the pier, where I intended to formally end my route! On I pressed, and followed the signs for a little bit longer, but I began to have doubts as to where they were taking me to when I didn't do much turning left to head into Eastbourne. Eventually after a quick check on my phone I abandoned the signs and headed down to the seafront. Upon later inspection, the signs were taking walkers to the cliffs to join the route along the coast, whereas the bike route should have headed straight down sooner.

In the end, I made my own way down :)
Speeding along the smooth tarmac felt wonderful. My body had been shaken and rattled from the final stony, chalky hills and rolling down the road was bliss.
When you go to the beach, you find a spot and take a picture with the local pier right?

Made it!
I spent a few minutes on the beach, and having been on the move for 19 hours I was still remarkably awake.
The final tally was:
Start: 00.28, Finish: 19:26
Distance: 167.6km
Climbing: 2900m
Calories burnt: ~5000ish
Times I nearly fell off: Many
Time I actually fell off: Twice
See the full details on Strava
In the gathering gloom I had hoped that this would be the end of my adventure, but thanks to the man at the station trying to save me £5, it wasn't over yet...
Now, had I been more awake, I would have asked more questions, but the guy at the station ticket office sold me a ticket from Eastbourne > Winchester along the south coast costing about £13, claiming via London would be a lot more expensive. He said I had just missed one train, but the next one would, via a couple of changes in Brighton and Southampton Central, get me back.
Once on the train, I realised that this train combination would in fact be three changes, and would get me in at 00:35. Given my increasingly state of delirium due to lack of sleep I clearly had impressed upon the ticket man that I would be willing to pay any amount to get into my bed faster than this merry jaunt would take.
So, out with the phone, and I tried to sort out an alternate route. There was a train leaving Brighton heading to Clapham Junction approximately 4 minutes after my train was due in. OK, so I'll just buy a ticket from the guard, and then hop across platforms when we arrive. Oh, the guard doesn't have a ticket machine, clearly this is going to be interesting...
I hared it from the train to the ticket machine, and tried to buy a ticket, with a railcard to Winchester. The touchscreen was not cooperating, and put in two "W"s in the destination field and backspace refused to work. Some internal expletives later, I got a ticket, and ran. Thankfully Brighton station was not very big, but large enough to have plenty of barriers for me to aim at, clutching my ticket. With the train about to depart, and my bike stowed in the appropriate area, I was on! Phew.
Next up, trains from Clapham Junction to Winchester, and I'd have 10 minutes to get to the appropriate platform. Easy. No such luck. By Croydon it was clear we were running late, 5 minutes by my reckoning. Getting to Clapham I was poised, ready at the door ready to race up some stairs to wherever platform 9 was... Up, down, and with no train yet there, I had made it! A minute later, and my train pulled up, I parked my bike and I was back on good old South West Trains...
At this point I was now due in Winchester at 22:52, some 1:45 sooner than Southern Trains' ridiculous route would have got me in. It might have cost me a wasted ticket from Brighton to Winchester along the slowest possible route, but it was totally worth it.
Back home by 11pm, a quick shower to remove the layers of accumulated dust and evapourated sweat, and then a soak in a bath... Finished. Sleep. Zzzz.


